Introduction
Header Notification Bar is a premium Joomla module which allows you to display a highly customizable notification bar at the top or bottom of your Joomla site. With 50+ predefined themes, advanced typography controls, animation effects, user targeting, and scheduling options, it's the most comprehensive notification solution for Joomla websites. This documentation covers the installation, configuration, and advanced usage of the Header Notification Bar module.
Installation
Downloading the Extension
Email: After you purchase the extension from our store, you will receive an email containing a link to download the extension.
Store: Alternatively, you can download the extension from the "Downloads" section in our store. If you are a new user, you need to create an account using the same email address you used for the purchase.
Click to download the extension package: HeaderNotificationBar_UNZIP.zip
Unzipping the Package
Use any file unzipper tool or WinRAR to unzip the HeaderNotificationBar_UNZIP.zip package. After unzipping, you will find the following contents:
- Folder Joomla 3 & 4: This folder contains the installation file
mod_header_bar_X.x.zip
compatible with Joomla 3.x and Joomla 4.x. - Folder Joomla 5: This folder contains the installation file
mod_header_bar_X.x.zip
compatible with Joomla 5.x. - ReadMe.txt: Contains vital information about the current version of the extension.
Installing in Joomla
- Go to your Joomla Administrator Panel
- Navigate to System > Install > Extensions
- Click on "Browse" and select the appropriate .zip file for your Joomla version
- Click "Upload & Install"
- Once installed, you'll find the module in Extensions > Modules
Basic Settings
After installation go to Extensions > Module Manager and open Header Notification Bar. You will find the following options in the first tab.
- Change the "Title of the module if you want.
- Set show title to Hide
- Select an existing template position
- Choose the Status to Published
Which position should you activate the Header Notification Bar?
You can activate the extension in any of the existing positions of your template. It is recommended to activate the module in "debug" position if available. The notification bar will appear at the top or bottom of the page regardless of the module position due to its fixed positioning.
Module Settings
After installation, the module needs to be configured to suit your requirements. Access the module settings by navigating to Extensions > Modules, and find Header Notification Bar in the list.
Module Settings
- Test Mode: Select whether to enable test mode to avoid setting cookies during testing.
- Options:
ON
,OFF
- Options:
- Notification Position: Choose the position of the notification bar.
- Options:
Header
,Footer
,Header Pushed
- Options:
- Distance from Top (px): Set the distance from the top of the page in pixels (only for
Header
andHeader Pushed
positions). - Distance from Bottom (px): Set the distance from the bottom of the page in pixels (only for
Footer
position). - Appear on: Choose whether the notification should appear on page load or on scroll.
- Options:
On Page Load
,On Page Scroll
- Options:
- Scroll Amount: Enter the scroll amount after which the notification will show (only for
On Page Scroll
). - Use: Choose whether to use a cookie or session to control the notification.
- Options:
Cookie
,Session
- Options:
- Cookie Expires in Days: Set the number of days before the cookie expires (only for
Cookie
).
Content Settings
- Message: Enter the message to be displayed in the notification bar. You can use HTML tags to format your message.
- Button Text: Enter the text for the call-to-action button (if any).
- Button URL: Enter the URL the button should link to.
- Button Target: Select whether the link should open in the same window or a new window.
- Options:
Same Window
,New Window
- Options:
Timing Scheduling
The scheduling feature allows you to display your notification bar only during specific dates and times.
Date Scheduling
- Enable Scheduling: Turn on date-based scheduling.
- Options:
ON
,OFF
- Options:
- Start Date: Set the date when the notification bar should begin displaying.
- End Date: Set the date when the notification bar should stop displaying.
Time Restrictions
- Time Restriction: Enable time-of-day restrictions.
- Options:
ON
,OFF
- Options:
- Start Time: Set the time of day when the notification should start displaying.
- End Time: Set the time of day when the notification should stop displaying.
This feature is perfect for time-limited promotions, special announcements, or alerts that should only appear during specific hours.
User Targeting
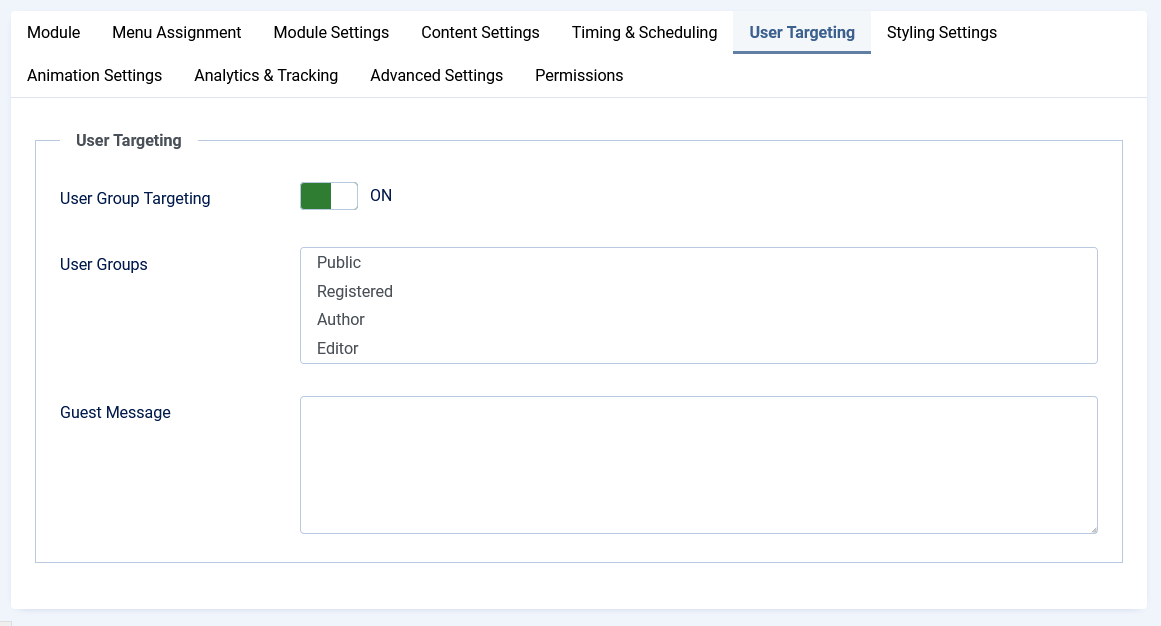
User targeting allows you to display different messages to different user groups or show the notification bar only to specific users.
- User Group Targeting: Enable targeting by Joomla user groups.
- Options:
ON
,OFF
- Options:
- User Groups: Select which Joomla user groups should see this notification.
- Available groups: Public, Registered, Author, Editor, Publisher, Manager, Administrator, Super User
- Guest Message: Set a different message to display to non-logged-in visitors (guests).
This feature is ideal for member-only announcements, admin alerts, or showing different promotions to different user segments.
Styling Settings
Styling Mode
- Styling Mode: Choose between predefined themes or custom styling.
- Options:
Predefined Theme
,Custom Styling
- Options:
Typography
Advanced typography controls are available for both styling modes:
- Font Family: Choose from system fonts or Google Fonts.
- Font Size: Set the size with various units (px, em, rem, vw).
- Font Weight: Set the weight (100-900, normal, bold).
- Text Transform: Apply text transformations (uppercase, lowercase, capitalize).
- Font Style: Set the font style (normal, italic, oblique).
- Text Decoration: Add underline, overline, or line-through.
- Line Height: Control the spacing between lines.
- Letter Spacing: Adjust the space between characters.
Predefined Themes
Choose from over 50 professionally designed themes:
- Default: Clean blue design with subtle button styling
- Modern Flat: Flat blue design with translucent button
- Material: Material Design-inspired elements
- Minimal: Light theme with subtle underlined button
- Corporate: Professional blue and gold color scheme
- Gradient: Purple to blue gradient with rounded button
- Dark: Dark theme with light text
- Colorful: Warm gradient with white button
- Urgent: Red alert design with bright white button
- Promo: Yellow theme for promotional content
- Seasonal: Green to blue gradient for seasonal promotions
- Rounded: Purple theme with rounded corners
- And 40+ more themes...
Each theme can be further customized using the Theme Editor, which allows you to edit the CSS directly with live preview.
Custom Styling
If you prefer complete control over the styling, you can use the custom styling mode:
- Notification Bar Style: Choose between flat or shadow style.
- Shadow Color: Set the shadow color (for shadow style).
- Background Color: Set the background color with opacity control.
- Bar Padding: Control the spacing inside the bar.
- Text Color: Set the color of the notification text.
- Text Size: Control the size of the text.
- Text Align: Choose text alignment (left, center, right).
- Hide Close Button: Option to show or hide the close button.
Button Styling
- Button Color: Set the background color of the button.
- Button Hover Color: Control how the button looks on hover.
- Button Text Color: Set the color of the button text.
- Button Text Size: Control the size of the button text.
- Button Radius: Set the roundness of the button corners.
- Button Class: Add custom CSS classes for advanced styling.
Animation Settings
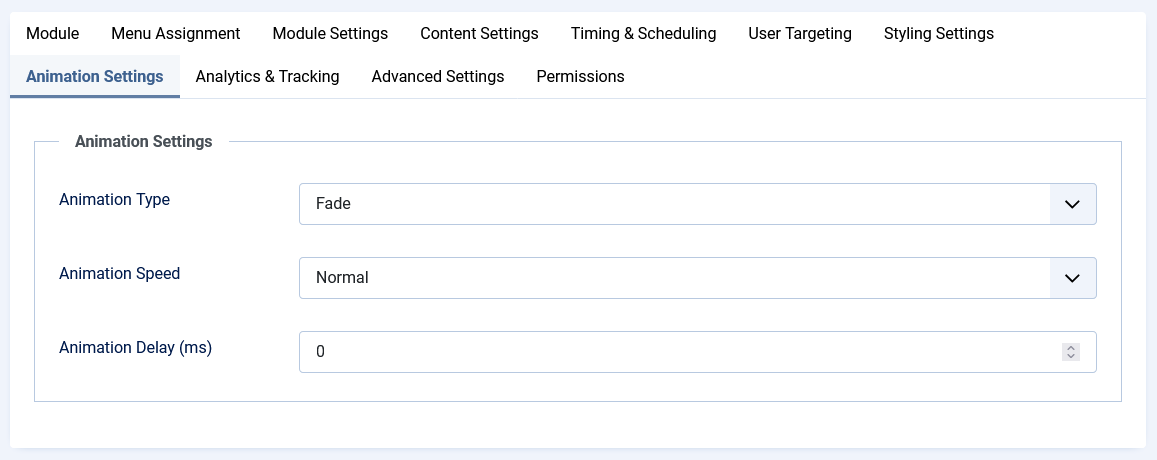
Make your notification bar more engaging with animations.
- Animation Type: Choose how the notification bar appears and disappears.
Fade
: Smooth fade in/out effectSlide
: Sliding from top/bottom effectBounce
: Dynamic bouncing effectNone
: No animation
- Animation Speed: Control how fast the animation plays.
- Options:
Slow
,Normal
,Fast
- Options:
- Animation Delay: Set a delay (in milliseconds) before the animation starts.
Animations can significantly increase user engagement with your notification bar, drawing attention to important messages or promotions.
Analytics Tracking
Track user interactions with your notification bar to measure its effectiveness.
- Enable Analytics: Turn on analytics tracking.
- Options:
ON
,OFF
- Options:
- Analytics Type: Choose which analytics system to use.
Google Analytics
: Track events using GAGoogle Tag Manager
: Use GTM for more flexible trackingCustom JavaScript
: Add your own tracking code
- Tracking ID/Container ID: Enter your GA or GTM ID.
- Track Events: Select which events to track.
View
: Track when the notification is seenButton Click
: Track when the CTA button is clickedClose
: Track when the notification is dismissed
- Event Category: Customize the category name in analytics reports.
Analytics integration helps you understand how users interact with your notification bar, allowing you to optimize your messaging and conversion rates.
Advanced Settings
- Module Class Suffix: Add a suffix to the module class for additional styling.
- Extra CSS: Add custom CSS code for advanced customization.
- Custom JavaScript: Add custom JavaScript to enhance functionality.
- Load via AJAX: Option to load the notification bar via AJAX for better performance.
These advanced settings give developers and power users complete control over the notification bar's behavior and integration with the website.
Troubleshoot
- Notification Bar Not Displaying: Ensure the module is published and assigned to a visible position. Also check that any scheduling or user targeting conditions are met.
- Theme Not Applying Correctly: If you've selected a predefined theme but it's not displaying correctly, try switching to a different theme and then back, or reset the theme CSS.
- Typography Not Working: Make sure you've correctly configured the typography settings. For Google Fonts, check that the font name is entered exactly as it appears on Google Fonts.
- Button Styling Issues: If your button styling isn't applying correctly, try adding
!important
to your custom CSS for the button elements. - Animation Not Working: Some animations may not work on older browsers. Try a different animation type or disable animations if you're experiencing issues.
- Analytics Not Tracking: Verify that your tracking ID is correct and that you've selected the events you want to track.
- Scheduling Issues: Ensure that your server's time zone is correctly set, as the scheduling feature uses the server's time.
- Content Not Updating: Clear the Joomla cache and browser cache to see changes.
- Module Loading Slowly: Try enabling the AJAX loading option in Advanced Settings to improve performance.
- Conflict with Other Extensions: If you're experiencing conflicts with other extensions, try adjusting the module's loading order or adding custom CSS to override conflicting styles.
For additional support, please visit our support forum at support.joomalx.com.
Use Cases
The Header Notification Bar can be used for various purposes across different types of websites:
E-commerce Websites
- Announce sales, promotions, and discounts
- Display shipping information (e.g., "Free shipping on orders over $50")
- Show limited-time offers with scheduling
- Display different promotions to different user groups
Business Websites
- Announce important company news
- Display business hours or holiday closures
- Promote new services or features
- Direct visitors to contact forms or booking systems
Blogs and News Sites
- Highlight featured content or trending articles
- Promote newsletter subscriptions
- Announce new content categories or features
- Display special announcements to registered users
Educational Websites
- Show important dates and deadlines
- Display campus alerts or notifications
- Promote upcoming events or webinars
- Show different information to students, faculty, and staff
Community and Membership Sites
- Display member-only announcements
- Promote upcoming community events
- Show welcome messages to new members
- Display different content based on membership level
Features
Key Features
- 50+ Predefined Themes: Choose from a wide variety of professionally designed themes.
- Theme Editor: Customize any predefined theme with the live CSS editor.
- Advanced Typography: Complete control over fonts, sizes, weights, and text effects.
- Google Fonts Integration: Access to hundreds of Google Fonts.
- Date & Time Scheduling: Display the notification bar only during specific dates and times.
- User Group Targeting: Show different messages to different Joomla user groups.
- Animation Effects: Add engaging animations to grab user attention.
- Analytics Integration: Track views, clicks, and closes with Google Analytics or GTM.
- Mobile Responsive: Automatically adapts to different screen sizes.
- Position Options: Display at the top, bottom, or as a pushed header.
- Scroll Triggering: Show the notification only after the user scrolls.
- Cookie Control: Set expiration for how long the notification stays hidden.
- Custom Button Styling: Full control over call-to-action buttons.
- Performance Optimized: Fast loading with minimal impact on page speed.
FAQ
-
How do I change the position of the notification bar?
- Adjust the Notification Position setting under Module Settings.
-
Can I have multiple notification bars with different designs?
- Yes, you can create multiple instances of the module with different settings and assign them to different pages.
-
How do I make the notification bar appear on scroll?
- Set Appear on to
On Page Scroll
and specify the Scroll Amount.
- Set Appear on to
-
Can I schedule the notification bar to appear only during a sale period?
- Yes, use the Timing & Scheduling settings to set a start and end date.
-
How do I show different messages to members and non-members?
- Use the User Targeting settings to target specific user groups and set a different message for guests.
-
How do I customize the button in the notification bar?
- Configure the Button Settings under Styling Settings.
-
Can I use my own CSS for the notification bar?
- Yes, you can add custom CSS in the Extra CSS field under Advanced Settings.
-
How do I track clicks on my notification bar?
- Enable the Analytics & Tracking feature and select which events you want to track.
-
Can I hide the close button?
- Yes, set Hide Close Button to
Yes
under Styling Settings.
- Yes, set Hide Close Button to
-
Is the notification bar mobile-friendly?
- Yes, the notification bar is fully responsive and adapts to all screen sizes.