Module Settings
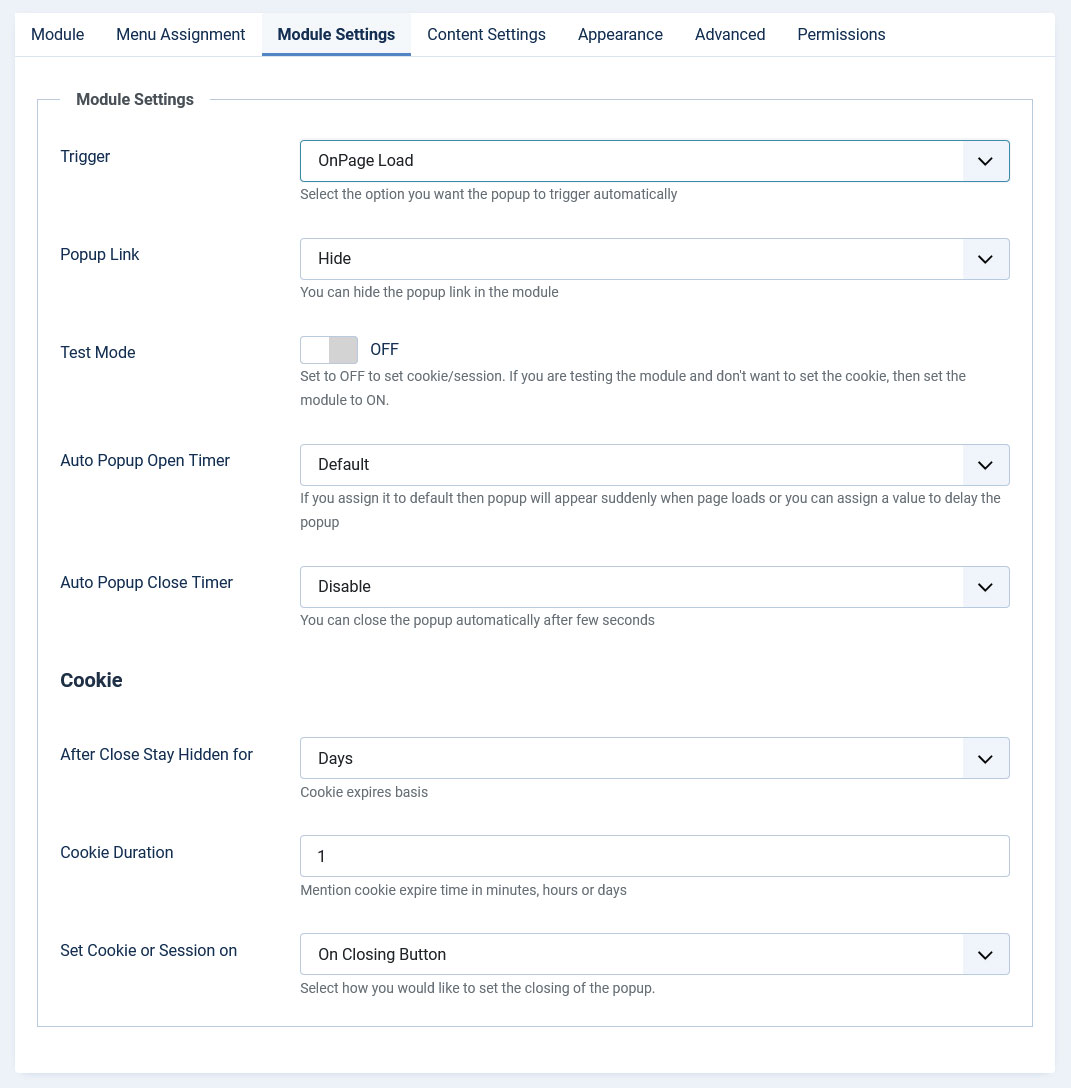
How to Trigger the Popup
- OnPage Load: Popup opens automatically when the page finishes loading.
- OnPage Scroll: Popup appears when the user scrolls down the page. You can set the exact scroll amount in the Advanced Settings tab.
- OnPage Exit: Uses exit-intent technology to detect when a visitor is about to leave the page. The popup will appear when the mouse cursor moves toward the top of the browser.
- OnScroll to Bottom: Popup appears when a visitor scrolls all the way to the bottom of the page.
- OnClick: Popup opens when a visitor clicks a specific link or image. You'll need to publish this link in a module position and set Popup Link Parameters to Show.
- Time on Page (Inactivity): Popup appears after the user remains inactive (no mouse movement, scrolling, or typing) for a specified duration. Perfect for re-engagement campaigns.
- Element Visibility: Popup triggers when a specific element on your page becomes visible in the viewport. Uses modern IntersectionObserver API for accurate detection.
- After X Page Views: Popup appears after the visitor has viewed multiple pages during their session. Ideal for building trust before showing conversion requests.
- Copy Text Event: Popup appears when a visitor copies text from your page. Useful for protecting content or offering resources.
- AdBlock Detection: Popup appears when an ad blocker is detected on the visitor's browser. Show relevant messages or offers to users with ad blockers enabled.
Import & Export Configuration
The Import/Export feature is located at the top of the module configuration and allows you to save and reuse module configurations:
- Export Configuration: Click this button to export your complete popup module configuration as a JSON file. This includes all settings from all tabs (Module Settings, Content Settings, Appearance, Referrer Targeting, Google Analytics, and Advanced Settings). Perfect for creating backups, sharing configurations with team members, or reusing successful setups across different modules or websites.
- Import Configuration: Click this button to select and import a previously exported JSON configuration file. All module fields will be automatically populated with the imported settings, saving you time on repetitive configurations. This is ideal for quickly setting up multiple similar popups or migrating configurations between websites.
Note: The Import/Export feature is the first fieldset you'll see when editing the module, making it easy to save or load configurations at any time.
Popup Link Settings
- Popup Link: Choose to show or hide the popup trigger link. This link can be placed inside a module or article using loadposition. Note that it cannot be linked to a menu item or another module.
- OnClick Element/Link: Choose between an image or HTML text that triggers the popup when clicked. Select "Image" to use a media file, or "HTML Text" to use custom HTML.
- OnClick Text: Add simple text or custom HTML with classes, IDs, and attributes. This appears when "HTML Text" is selected for the OnClick Element.
- Select an Image: Choose an image from your media library to use as the popup trigger. This appears when "Image" is selected for the OnClick Element.
- Sticky Element Position: Set the position of the text/image trigger element. Options include Module Position, Right Top, Right Bottom, Left Top, Left Bottom, Vertical Right Centered, or Vertical Left Centered.
- Sticky Element Background Color: Set the background color for the sticky trigger element.
- Sticky Element Text Color: Set the text color for the sticky trigger element.
Timing Options
- Test Mode: When set to ON, cookies/sessions aren't stored, allowing you to test your popup repeatedly without clearing browser cookies. Once you've finalized your settings, set this to OFF for normal operation.
- Auto Popup Open Timer: Delay the popup's appearance by a specific time. For example, to open the popup after 10 seconds, set this to 10000 milliseconds. For immediate display, select Default.
- Auto Close Timer: Automatically close the popup after a set time. To close after 5 seconds, select Enable and set the value to 5000 milliseconds.
Cookie Settings
- Hide Popup Link: Choose whether to hide the trigger link after the cookie/session is set. If not hidden, the link will remain visible but inactive.
- After close stay hidden for: Set how long the popup remains hidden after being closed - Session, Seconds, Minutes, Hours, or Days.
- Cookie Duration: Enter a number value for the duration. For example, enter 15 for 15 minutes, 30 for 30 days, or 2 for 2 hours (depending on the unit selected above).
- Set Cookie or Session On: Choose when to set the cookie - either when the close button is clicked (On Closing Button) or automatically when the page loads (On page Load).